Tuesday, July 24, 2012

misty mountain


even at the end of july, northwest oregon is grey.

in spite of the potential – or, inevitable – soft rain, it’s summertime, and all i want to do is go the coast and walk, bare feet, along the icy water, spotting pelicans and drift wood and half broken sand dollars.

the pacific is beautiful – dark and rugged and gusty, spotted with blackberries and hydrangea.

by the time brian, a close friend of mine, and i left portland, the coastal mountains were covered in clouds. we’d both forgotten rain coats, tricked by the sunny city.


a little rain never hurt no one, so off we went. ella, our friends dog, lead the way, forest bound.

without the clear sky, it’s easier to notice what’s on the path, as opposed to what lies in the distance.


i love the way the flowers hold mist.


we climbed and climbed and climbed.

and climbed.

walking in clouds.


by the time we reached the top, our ankles muddy, ella panting, humidity clung to our cheeks, we were hungry as ever. 

i pulled out a little snack i’d prepared the day before.


this recipe is originally from a favourite blog of mine, smitten kitchen. the version that follows has my own alterations, and can be made with any nuts and dried fruit you have stored in the cupboard.

(this time, i was lucky enough to spot jars of pignoli and goji berries, both special and rare treats to add a little something different)


so if you're walkin' through the mountains anytime soon, here's a treat for the top:


Saddle Mountain Granola Bars

1 1/2 cups rolled oats
1/2 cup granulated sugar
1/3 cup oat flour (made by processing 1/3 cup oats in food processor)
1/3 cup goji berries (or any other dried fruit, i especially love cranberries)
3/4 cup almonds (add pecans or walnuts, if you’ve got ‘em)
6 tablespoon melted butter
1/3 cup honey
1/3 cup peanut butter
1 tablespoon water


preheat oven to 350

line an 8 by 8 baking pan with parchment paper

in a medium bowl, toss together the following ingredients: oats, oat flour, sugar, dried fruit, almonds

whisk together butter, peanut butter, honey, and water


pour butter mixture over dry ingredients and mix until thoroughly combined

place in pan and press down so ingredients reach the corners and are spread out evenly

bake for thirty minutes


remove from oven, cool over night

the next morning, cut into squares


Monday, July 16, 2012

phở ga lesson 101

let me speak quite briefly, if i may, about the city where I live


a lot has been said and satirized about portland – the whimsical life of unemployed young people, the sense of urgency for a morning latte from the coffee shop down the street, the trendy cigarette smoking hipsters on fixy bicycles.

i’ll stop there.

there are characters everywhere, this place is full of them.

yet what strikes me most about this city is all that is not spoken of, all that is not seen upon first glance.  amidst the strange and complicated truths of this state’s haunting history, and the modern image of a gentrified-trendy-gardening-commune of a city, it is the immensely diverse undertones of this place that give it it’s complexity, it’s mysticism, it’s richness, it’s beauty.

and that is why i love it here.

of the places where this beauty has been most starkly manifested, food, of course, is my favourite.
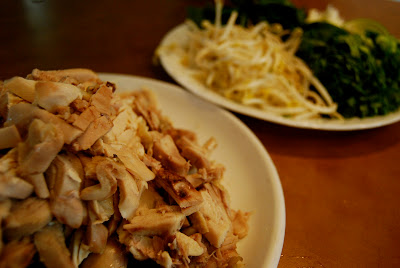
one of the best, by far, is phở - vietnamese beef noodle soup served with a plate of fresh herbs. cuts of beef can range from raw beef round, to chewy tendon, and well cooked flank. it is aromatic and fresh and warming.  not to mention, it’s traditionally served for breakfast.

anh luu, a dear friend of mine, taught me how to make phở ga, vietnamese chicken noodle soup. she is quite the lady – vivacious, intelligent, honest, loving.  anh is first generation vietnamese, raised in new orleans, and let me tell you, she’s one hell of a cook.

most of the ingredients that follow can be found at any asian grocery store. here in portland, we are lucky to have a seemingly infinite amount of hidden stores filled with essentials for any asian meal – including the infamous fubonn, self-proclaimed as “oregon’s largest asian mall.” this place is explosive – the tall ceilings, the long aisles and florescent lights, the children zipping to hide behind rice bags, the grocery carts filled with dried plums and tamarind candies, fresh lychee and yuka and lemon grass. it’s an easy place to spend a few hours getting lost with premonitions of weekday dinner projects and people watching and deciphering labels. it’s a favourite place of mine because it’s wild – wild with colour, wild with aroma, wild with faces and sounds. it’s certainly a non-traditional exposure to this city’s culinary brilliance. 


before i even begin to write a grocery list, it is important to note that as with any cook, anh’s proportions are scant –  give or take this or that, depending on what you like.  i like to look at it as a beginning point to cultivating kitchen creativity.

so without further ado, here’s what you’ll need

for the stock, and soup itself

one whole chicken, bone in plus two drumsticks and thighs
two yellow onions
ginger root, about five inches long
pho spice packet – these vary, but they usually consisting of whole coriander, star anise, cinnamon stick, cloves, and cumin
fresh rice noodles
fish sauce

for the garnish

one bunch green onions
one bunch fresh cilantro
one bunch fresh thai basil
a few handfuls of fresh bean sprouts
one lime

. . .

to begin, position a rack in your oven to the highest level  

turn your oven on HI broil

cut your onions in half, leaving the skin on.
drizzle a little bit of vegetable oil on a pan.  place the onions – skin side up –  as well as the whole ginger root, on the pan. place in the broiler, and set your timer for ten minutes.

the reason we are doing this is to char the onion and ginger skins.  anh says that the skin is what has the most flavour on both the root and the vegetable.  we roast both in order to deepen their flavour before adding them to the stock. when the skins are charred enough, they will be removed, but their essence remains in the remaining portions of the onion.


while your timer is going, fill a large stock pot with water. while water is heating, rinse your meat off in the sink under cold water, set aside in a bowl. once water is boiling, carefully place the chicken inside.

in the mean time, pull out your onions and ginger from the oven. remove charred skins from both. chop ginger into big pieces. set onions and ginger aside.


in your stock pot, once the boil returns, remove chicken from water and set aside. drain all the water in your sink.  

fill your pot back up with cold water and place the chicken back in the pot along with your chopped ginger, onions, and pho spice sachet.

bring your stock to a boil, then down to a simmer.

simmer for about an hour and a half

this is the time when you sit on the porch, have a cup of tea, read the paper. by the time you flip the page, the star anise will have made it’s way out to you. mmm..


remove chicken from stock pot. using a cleaver (if you don’t have one, it’s okay, a sharp knife will do the trick) remove the chicken from the bone – literally, cut the bones, this way you’ll expose the marrow and that’ll make the stock very rich.  Place the chicken on a cutting board, and the bones back into the pot. continue to simmer the stock for another thirty minutes to bring out the flavours of the marrow. at this point, you can add fish sauce (this is your salt) and sugar to the stock, the proportions are dependent on your personal taste.

as far as fish sauce goes, here is what anh has to say: the lighter the sauce, the better. the reason for this is that the darker sauces tend to have more impurities in them, having been strained with less attention, and are often times more “fishy.” on the other hand, the lighter sauces are strained more carefully, and usually capture the “saltiness” desired.

while your stock is finishing up, you can prepare your rice noodles and garnish.

bring water to a boil over high heat, and prepare rice noodles depending on the directions on the package. these, of course, vary from brand to brand. once they are cooked, cool them under running cold water and set aside.

for the garnish, coarsely chop cilantro; leave bean sprouts whole; leave thai basil on it’s purple stock; cut lime in wedges; thinly slice tops of green onions, take the bottom white and light green portion and cut it down the middle –  this way it will just barely cook in the hot broth and become soft and sweet. 


pull out a bowl and fill it in this order:
rice noodles
chicken
all of the garnish that you want – wait a second for the lime!
stock
squeeze lime over soup, add more fish sauce is necessary


...slurp!

Monday, July 9, 2012

blueberry blackcap jam

sunday has always been my favourite day of the week.

growing up, sunday morning meant mama got her new york times and papa made dutch babies and my brother would wake up late and listen to fats waller.

now, it’s the day of my neighborhood farmers market and i love to walk down the quiet streets and listen to the humming of the baptist churches.

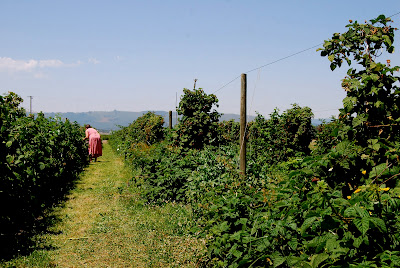
yesterday it was hot. well, hot for portland (seventy-nine ain't too bad for most folks). i skipped the market and the gospel hymns, and headed for the countryside on sauvie island, a long stretch of farm land in the willamette river, to pick berries in the sunshine. 


our destination was columbia farms, a sweet family owned "u-pick" farm about five miles inland.  to get there, we passed long horned cattle grazing in wispy yellow grass and osprey nests that tilt over fake telephone poles and quickly moving cyclists

 the farm land has all sorts of berries; strawberries, raspberries, boysenberries, blackberries, currents, blueberries. they also have blackcaps. i'd never seen them before, they're slightly chalky, small, dark berries. they are soft and sweet and lovely. 

we picked until our baskets were full, and headed home across the saint johns bridge and with sun stained skin and sleepy eyes, the afternoon inevitably became a much appreciated, extended siesta.


when i woke up this morning, i could hardly think of what to do with the crates of berries that covered my dining room table. actually, to the contrary, i couldn't think of what NOT to do. 

because it's summertime, i tend to get nostalgic about norther michigan - the fresh water swims, the smoked salmon roadside stands, the four dollar diner breakfast, the hidden petoskey stones, the sky.  so today, i decided to make a batch of jam that i made last last summer from wild northern michigan blueberries.

it is a recipe i will continue to make over the course of my life, as a reminder of home. 

the base for this recipe comes from the blue chair jam cookbook "blueberry jam with mint" by rachel saunders 

rachel saunders recipes for jam are immaculate - the photographs in her book are lovely and her commentary on fruit and jam making is romantic and heartfelt. the blue chair jam cookbook is one of my favourite books to flip through just for the pure joy of it. the recipe that follows is paraphrased from her own.

blueberry blackcap jam

2 pounds 2 ounces blueberries
10 ounces blackcap berries
1 pound 10 ounces white cane sugar
6 ounces freshly squeezed lemon juice, strained

preheat your oven to 250 degrees, place a rack in the middle. while it is heating, rinse out six 250 ml glass ball canning jars. place glass on a sheet pan, and leave lids out to air dry on a clean towel. once oven is hot, place sheet pan inside. the jars should heat in the oven for at least a half an hour to ensure that they are fully sterilized. now, place 3 spoons in your freezer - these will be used for testing readiness of jam.


in a wide pot, combine blueberries, black caps, sugar, and lemon juice over medium-high heat. stir constantly. when the blueberries turn glossy and plump, they will start to release their juices. at this point, turn your heat to high and continue stirring until mixture begins to boil. once it reaches a boil, cook for 10 minutes, stirring all the while.

after 10 minutes, you can begin testing for doneness. i think that rachel saunders method for checking doneness is fool-proof, it is as follows: "to test for doneness, carefully transfer a small representative half spoonful of jam into one of your frozen spoons. replace the spoon in the freezer for 3 to 4 minutes, then remove and carefully feel the underside of the spoon. it should be neither warm nor cold; if it is still warm, return it to the freezer for a moment. tilt the spoon vertically to see whether the jam runs; if it does not, it is ready. if it does, cook the jam for another few minutes, stirring, and test again as needed"

pull out your sterilized jars from the oven. carefully pour the jam into each jar. making sure lids are totally dry, put then on tightly to each jar. place capped jars back into oven and heat for about 10 minutes to help sealing process. 

remove from oven, place jars onto a cooling rack.